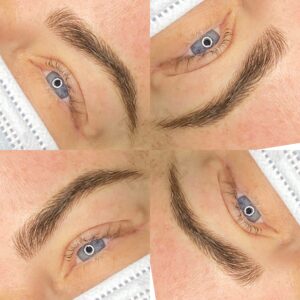
How Brows Are Mapped Before Microblading: A Step-by-Step Guide to the Golden Ratio Method
The most important part of microblading happens before any pigment goes into the skin. It is the mapping: the careful planning of where your brow starts, where it arches and where it ends. If you’re researching studios offer, understanding the mapping stage helps you see what you’re paying for, what to expect at your consultation, and how to judge a good artist. This guide walks through the process step by step.
Why Mapping Matters More Than the Strokes
Anyone can learn to draw hair-like strokes. What makes brows look natural, balanced and flattering is where those strokes are placed. A shape that is too high, too wide or too short can make a face look surprised, stern or unbalanced, and once pigment is in the skin it can’t simply be wiped off.
That is why a proper mapping stage is the difference between brows that look like yours, only better, and brows that look “done”.
What PhiBrows Means
PhiBrows is a technique of drawing eyebrows manually on the skin, designed to leave brows looking natural and proportional to the client’s face, using the Golden Ratio, which is the ratio 1 to 1.618. The method also uses its own tools. These include the BB Compass for measuring and mapping eyebrows. The compass is described as using golden ratio principles together with a flip measurement feature, so that results can be customised for each client. PhiBrows Online Course by Branko Babic +2
The idea is simple: instead of drawing a shape from a trend or a photo, the artist measures your face and uses those proportions to design brows that suit it.
A Golden Ratio Is a Guide, Not a Guarantee
It’s worth being honest here. Human faces aren’t perfectly symmetrical, and beauty is personal. A ratio can give a helpful framework, but it can’t tell an artist what you like or how your brows naturally grow. A good artist uses the measurements as a starting point, then adapts them to your bone structure, your existing hair and your preferences. If anyone promises “mathematically perfect” brows, treat it as marketing, not a promise.
Step 1: The Conversation
Mapping begins with talking. Your artist will ask what you like and dislike about your brows now, how you usually wear them, whether you want a soft or defined look and what you want to change. Bring photos of brows you like, as a way to explain your taste, but expect your artist to adapt them. A shape that looks lovely on someone else may not suit your face.
Step 2: Looking at Your Natural Brows
Your own brows are the best guide. The artist will look at:
- where your hair grows and in which direction
- any gaps, scars or sparse patches
- natural asymmetry between the two brows
- the position and shape of your brow bone and eyelids
- how your brows move when you raise and lower them
Using your natural growth pattern is what makes the finished strokes look believable.
Step 3: Measuring the Key Points
Brow mapping usually plans three key points, and measurements link them to features on your face:
- The start of the brow: often aligned with the side of the nose and the inner corner of the eye. Too close and the brows can look intense, too far apart and the face can look wider.
- The arch (the highest point): often planned over the outer part of the iris, so that the brow lifts the eye without looking surprised.
- The end of the brow (the tail): usually planned along a line from the nostril past the outer corner of the eye, so that the brow finishes in a balanced place.
These are common starting points, not strict rules. In the PhiBrows method, the artist uses a compass-style tool to measure these proportions against your face, and then adapts the result to you.
Step 4: Drawing the Shape
Once the key points are set, the artist draws the brow outline on your skin with a pencil, or a similar marking tool. This is your chance to review it. You’ll usually sit up and look in a mirror from different angles, because lying down can make brows look different. If anything feels wrong, say so. Changes are easy at this stage.
Councils advise that any pencil used for marking the skin should be single use only, so it’s reasonable to ask about hygiene even at this stage. westsuffolk
Step 5: Choosing Pigment Colour
Colour is planned with the shape, not after it. Your artist considers your natural hair colour, your skin tone and undertone, and how pigment is likely to look once healed. Pigment often looks darker and bolder at first, then softens as the skin heals, so the colour is chosen with the final result in mind. A good artist will explain how colour may change and fade over time.
Step 6: Skin Type and Suitability
Mapping isn’t only about shape. Your skin type matters too. Very oily skin can cause strokes to blur and fade faster, which may mean microblading isn’t the best option for you. An honest artist will say so rather than proceed. They should also ask about:
- pregnancy or breastfeeding
- allergies, including to pigments and numbing products
- skin conditions or irritation in the brow area
- medication and health conditions
- a tendency to scar or heal slowly
A patch test and a health questionnaire are good signs of a careful studio.
Step 7: Numbing, Strokes and Finishing
Once you have approved the shape and colour, a topical numbing product is usually applied. The artist then creates the hair-like strokes, following the direction of your natural growth. Microblading involves puncturing the skin and inserting pigment, so it should only be done with single-use, sterile equipment. Afterwards, you’ll receive aftercare instructions. melton
Healing and the Touch-Up
Healing takes a few weeks. Brows look bolder at first, then flake and soften, and the colour can seem to fade before it settles. A touch-up appointment, usually several weeks later, allows gaps and uneven areas to be corrected. Microblading is semi-permanent, and many people have a refresh when the colour fades.
What to Ask a Studio Before You Book
- How will you map my brows, and will I see the shape before you start?
- Are you trained in the PhiBrows method or another mapping system?
- Is the equipment single-use and sterile?
- Are you and your premises registered with the local council?
- Can I see healed results on skin like mine?
- What happens at the touch-up?
Councils note that there is no mandatory, legally required training for microblading, so a technician should have knowledge and experience of infection prevention and control. That makes training and hygiene questions even more important. basingstoke
Book Your Consultation
At Angel Skin Lab, Angel has worked as a skin and PMU specialist since 2018, and every brow journey starts with a conversation and careful mapping. If you’re looking for PhiBrows Cheadle and Stockport clients can rely on, come in, ask your questions and see the shape planned on your face before you decide. You can read more about the method in this PhiBrows guide to the golden ratio.
📍 Angel Skin Lab, Suite S61, Bizspace Cheadle Place, Stockport Road, Cheadle, Stockport, SK8 2JX
📞 Call/text/WhatsApp 07889467434
🌐 angelskinlab.co.uk
https://angelskinlab.co.uk/microblading-2/